👥 6b. Setting Up Users and Roles
Siebel security is built on users, responsibilities, and data visibility controls. Learn how to set up users and control their access to views and data.
1. Creating Users in Siebel
Step 1: Navigate to User Administration
Path: Site Map → Administration - Application → Users
- Click New button to create a new user
- Enter required fields:
- Login Name: Username for authentication (e.g., AGENT01, SALESREP05)
- First Name, Last Name: User's full name
- Email: For notifications and password resets
- Organization: Assign to organizational unit
- Division: Business division (Sales, Service, Marketing)
- Set initial password (user must change on first login)
- Activate user by checking "Active" checkbox
Step 2: Assign Responsibilities
What are Responsibilities? Define what views, screens, and functions a user can access

Common Telecom Responsibilities:
- Call Center Agent: Access to Service Requests, Accounts, Contacts, Knowledge Base (read/write SRs only)
- Sales Representative: Access to Opportunities, Quotes, Orders, Campaigns (read/write own data)
- Service Manager: All Service views + Reports + Dashboards (read/write team data)
- System Administrator: Full access to all views including Administration
How to Assign:
- In User record, navigate to "Responsibilities" applet (bottom section)
- Click New → Select responsibility from list
- Set Start Date (when access begins) and End Date (optional, when access expires)
- Save the record
2. Controlling View-Level Access
View Visibility Rules
Responsibilities determine which views (screens) appear in the user's site map.
Example:
- Call Center Agent sees: Home, Service Requests, Accounts, Contacts
- Call Center Agent does NOT see: Opportunities, Quotes, Admin screens
Limiting Access to Specific Views:
- Admin creates custom responsibility (e.g., "Tier 1 Agent - Limited")
- In Siebel Tools, configure which views are included in that responsibility
- Assign responsibility to user → User only sees authorized views
- Any unauthorized view access attempt → "Access Denied" error
Example: Creating a Limited Access Role
Scenario: New trainee agents should only handle simple SRs, not access billing or account changes
- Create responsibility: "Trainee Agent"
- Include views: Service Requests (read-only), Knowledge Base, Contacts (view only)
- Exclude views: Billing, Account Edit, Orders, Opportunities
- Assign to all trainee users
- After training period, upgrade to "Call Center Agent" responsibility with full access
3. Data-Level Visibility Controls
Position-Based Access Control
Beyond views, control which records users can see within a view.
Three Levels of Data Visibility:
1. Personal Visibility (Most Restrictive)
User sees only their own records (SRs assigned to them, Opportunities they own)
2. Team/Group Visibility
User sees all records for their team/division (Manager sees all team member SRs)
3. Organization Visibility (Least Restrictive)
User sees all records in the organization (Admins, Executives)
How to Configure Data Visibility
- Create Position: Site Map → Administration → Positions
- Create position: "Service Manager - Northeast Region"
- Set visibility: "Group" (sees all team records)
- Assign User to Position: In User record → Position field → Select position
- Set Position Hierarchy: Define reporting structure (Agent → Manager → Director)
- Result: User automatically sees records based on position rules
Example:
- Agent Position: "Personal" visibility → Sees only assigned SRs (50 records)
- Manager Position: "Group" visibility → Sees all team SRs (500 records from 10 agents)
- Director Position: "Organization" visibility → Sees all SRs (5,000 records across all regions)
4. Advanced Security: Field-Level Access
Restricting Field Visibility
Control which fields users can see or edit within a record.
Common Use Cases:
- Billing Information: Only billing team sees customer payment details
- Sensitive Notes: Manager comments visible only to managers, not agents
- Discount Approvals: Sales reps can request discount, but only managers can approve
Configuration: Define in Siebel Tools → Field access controlled by responsibility
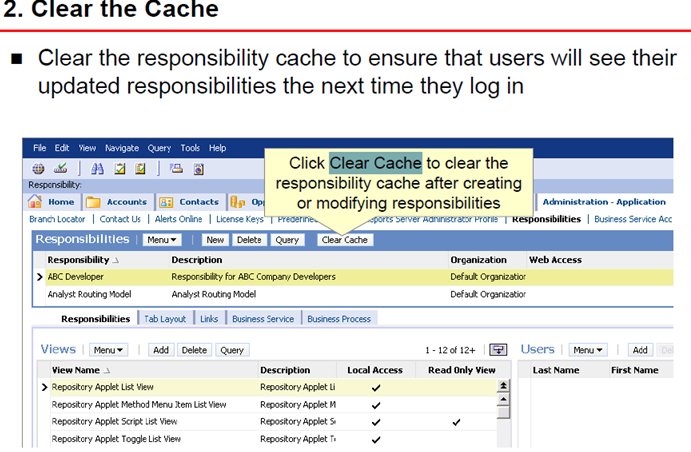
5. Cache Management
Why Clear Cache?
After changing user responsibilities or security settings, clear the cache to apply changes immediately.
When to Clear Cache:
- After adding/removing user responsibilities
- After changing position assignments
- After modifying visibility rules
- After importing new users in bulk
How to Clear Cache:
- Navigate: Site Map → Administration - Server Configuration → Enterprises
- Select your enterprise server
- Click "Clear Cache" button
- Wait 2-3 minutes for cache refresh
- Ask affected users to log out and log back in
Best Practices Summary
- ✅ Use pre-defined responsibilities when possible (less maintenance)
- ✅ Follow least privilege principle - grant minimum access needed
- ✅ Create position hierarchy that mirrors org chart for automatic visibility
- ✅ Test new users in test environment before production
- ✅ Document custom responsibilities and their purpose
- ✅ Review user access quarterly, remove inactive users
- ✅ Always clear cache after security changes
- ❌ Don't give admin access unnecessarily (security risk)
- ❌ Don't share login credentials between users (audit trail breaks)